InspireMe Crafts

Creative inspiration for the home, entertaining, and unforgettable gifts

Gotta Make It: Muffin Gift Box December 19, 2007

“Being happy doesn’t mean everything’s perfect.  It means you decide to see beyond the imperfections.”

muffin.jpg

I SOOOOO wish I could take credit for this super cute and clever idea…but I can’t!  My mom purchased this at a Holiday Bazaar in Washington State and unfortunately the talented  and creative mind behind this didn’t leave too much information for me to give her credit.  All I know is her name is Regan Denke and she goes by Ms. Crafty’s Creations.  Like I said…I wish I had more info.  She made a tag that said “You’re getting…muffin for Christmas!!” and in the inside of the box she included directions for Blueberry muffins along with the mix and some holiday cupcake liners.  The papers she chose are adorable and she used bells on the bottom of the box as little leg stands…how clever!  She gets an A+!!!!

If you’ve seen an adorable and clever ideas please share and email us at inspiremecrafts@yahoo.com.

Be inspired, get creative, and have fun!!!!


Gotta Make It…with the Kids: Ornaments December 17, 2007

“The Star that led the Wise Men then still shines to guide the hearts of Men.”

 reindeer-ornament.jpgsnowflake-ornament.jpg

glass-ball-ornmanet.jpgjoy-ornament.jpg

I’m not much of an “organized group” type of person.  I never did the sorority thing or joined any clubs.  I have nothing against them at all – it just wasn’t for me.  I’m not sure why and this post certainly isn’t the place to delve into my psyche to figure out why I am the way I am.  However, it does bring me to the point that I forced myself to get out of my comfort zone and try out some “organized groups”.  I went to my first MOMS club event today with my son.  I won’t go into all the details, but my son had a blast and we made some really cute ornaments that are super easy.  In fact, I am just going to share the pictures, because I am sure you can figure it out from there!  Have fun with the family and get crackin because the countdown continues…..

Be inspired, get creative, and have fun!


Gotta Make It: Paper Wreath December 16, 2007

“Joy to the World”

finished-photo-wreath.jpg

Accidents happen…sometimes good and sometimes bad.  Luckily, this accident was good.  I was playing with some paper trying to come up with less labor-intensive paper tree ideas and ended up with a paper wreath!  I added some special photos and it is adding just the right amount of unique Christmas decorations to our house!  I used the same scrapbook paper that I used for my Christmas Paper Tree . I purchased the scrapbook paper at Target in a pack.  It included all 5 coordinating designs and plenty of it! 

MATERIALS:

8×8 paper (10 pieces)
scissors
glue
stapler
Scotch Tape
ribbon
embellishments
photos

THE STEPS:

photo-wreath.jpg

I tried the best I could to explain it…I’m still working on describing my steps as clearly and detailed as I can.  Please let me know if you have any questions or comments about it!  I love to get comments on the post or you can email me at inspiremecrafts@yahoo.com.

The Holidays are here and Christmas is only 9 days away!  Its hard to believe, but that’s what I saw on a sign today!  Take care….

Be inspired, get creative, and have fun!!


Gotta Make It: Photo Magnets and Decorated Tin December 6, 2007

“Christmas is not in the presents, but in the presence”

photomagnets-collage.jpg

Our kitchen table is officially a disaster zone.  I decided I couldn’t procrastinate any longer on getting all the presents made if I wanted any chance of being at the post office less than an hour.  I’m not sure if that is possible this time of the year, but I am sure going to try.  So if you are like me and both sides of your family are huge and leave you a zillion aunts, uncles, and cousins to think about for Christmas presents than this is the perfect gift for you to make!  Its inexpensive and relatively quick! 

Go to your local craft store and pick up the following:

Small tins (like the Altoid tins) or Already decorated tins (I found the tin in the 3rd picture at the Dollar Tree)
Instant Krazy Glue – Brush On (trust me…the others don’t work)
Magnets (I used ProMag – they come in various sizes and are circular)
Clear Marble Accents with a flat side (make sure they are clear.  The best ones I found were at the Dollar Tree….better price and clearer than the ones at Michaels)
Circle Punch or Circle stencil
Favorite Paper, Accents, and Ribbon
Favorite pictures, photo paper, etc

Ok- so now that you have all the supplies lets get going on the How-To’s. 

1. Using your circle punch or stencil cut out your favorite photos or designs from paper.  (Note:  I glued a plain piece of photo paper to the back of my picture and scrapbook paper to make it thicker and so you wouldn’t see the magnet.)

2.  Using the Krazy Glue Brush, apply the glue to the flat side of the marble.  Quickly apply the picture face down to the marble.  This next step is key:  Press down firmly for 30 seconds with your thumb and fingers.  You want to make sure the glue spreads out and that you don’t have any bubbles.  I had quite a few that I had to toss because I wasn’t doing this step well enough.  You might want to have nail polish remover (to unglue you) near you because this glue is strong and there were a couple of times I thought I glued my fingers together….ooops!

3.  After letting the picture and marble dry for a couple of minutes, take the magnet and apply the Krazy Glue to one side.  Then attach that magnet to the back of the marble.  Hold firmly for 30 seconds and let it set for a couple more minutes. 

4.  Voila!  Your magnets are done. 

5.  Now decorate your tin. I used spray adhesive to attach my paper to the tin and then Mod Podged the top (I did a couple coats).  I added some ribbon around the bottom of the tin and some embellishments. 

6.  Place the magnets in the tin and you have completed one of your gifts…good for you! 

Like I mentioned before, if you want to make this a quick present you can find some cute tins at the Dollar Tree.  I purchased the “Paris” tin from there and decided to go with that theme for the magnets so I just used leftover black and white scrapbook paper.  I also used scrapbook paper for the wine magnets and then created my own photos and “I love U” magnets in Microsoft Word.

I hope this idea gets you moving on getting those Christmas gifts all done.  This would make a great stocking stuffer along with presents for all those extended relatives and friends! 

Be inspired, get creative, and have fun!


Gotta Have It: Glitter Letters November 30, 2007

“It is Christmas in the heart that puts Christmas in the air”

joy-letters.jpg

We declared after our holiday traveling fiasco last year that we were not traveling this year.  And guess what?  A lot of family is coming to us!  This is my first time hosting a Christmas and to be honest…I’m losing sleep over it.  I keep thinking of all the “To-Do’s” and have to constantly remind myself to relax…its not that big of a deal.  But to me it is.  I want it to have a nice Christmas feel, for our guests to be comfortable, for our home to be everyone’s home away from home, and to cook a kick-ass Christmas dinner! (this is where my mother would tell me that no boy would want to marry me with a mouth like mine….see – moms aren’t always right). 

We really haven’t accumulated a lot of decorations since we are a young married couple so I am looking for decorations while making sure we have enough sheets, towels, and figuring out how to make a turkey…ahhhh!!!! And keep in mind we are budget conscious.  So not only am I here to share some Christmas ideas, but when I find some good deals I HAVE to share them with you too because I just get so excited.  So in the picture you see my little “JOY” creation.  Two stops – JoAnn Fabrics and Dollar Tree.  The glitter letters are from JoAnn Fabrics and were a dollar each.  They come in gold or silver.  For some reason they were all spread out in our store so I did have to do some hunting to find the letters I wanted, but for that price it was worth it.  The round cranberry wreaths were found at The Dollar Tree.  Now I originally didn’t buy these Christmas decorations for this project.  The cranberry wreaths were hanging as just some decoration.  I tried hanging the “JOY” letters with ribbon around one of our windows but it just wasn’t working for me.  So that is when I had my ah-ha moment.  You know you get those…you just have to think outside the box.  I took the ribbon and tied it to the cranberry wreaths and voila!  A quick, easy, and inexpensive Christmas decoration. 

I’ll tell you now.  Go to the Dollar Tree.  Go with out the kids so you can take your time going through there.  There are some great basics that help you make adorable inexpensive gifts (you’ll see in the days to come) and decorations that won’t break the bank.  Who wants to spend loads of money on decorations that you may change next year?

Until later….

Be inspired, get creative, and have fun! 


Gotta Make It: Paper Christmas Tree November 27, 2007

Filed under: Christmas,Entertaining,Gotta Make It,Gotta Make It...with the kids,Home — inspiremecrafts @ 10:54 pm

“He who has not Christmas in his heart will never find it under a tree.”  ~Roy L. Smith

paper-star.jpg

I’m here, I’m here!  I have been wanting to share some Christmas craft ideas for awhile, but the combination of being out of town for most of November and trying to make our house all “Christmasy” has left me a sparse amount of time to spare.  But now the lil bugger is down for the night (hopefully) and the husband is working late.  Ahhh…peach and quiet!  What more can you ask for?  Maybe a glass of wine to go with that….

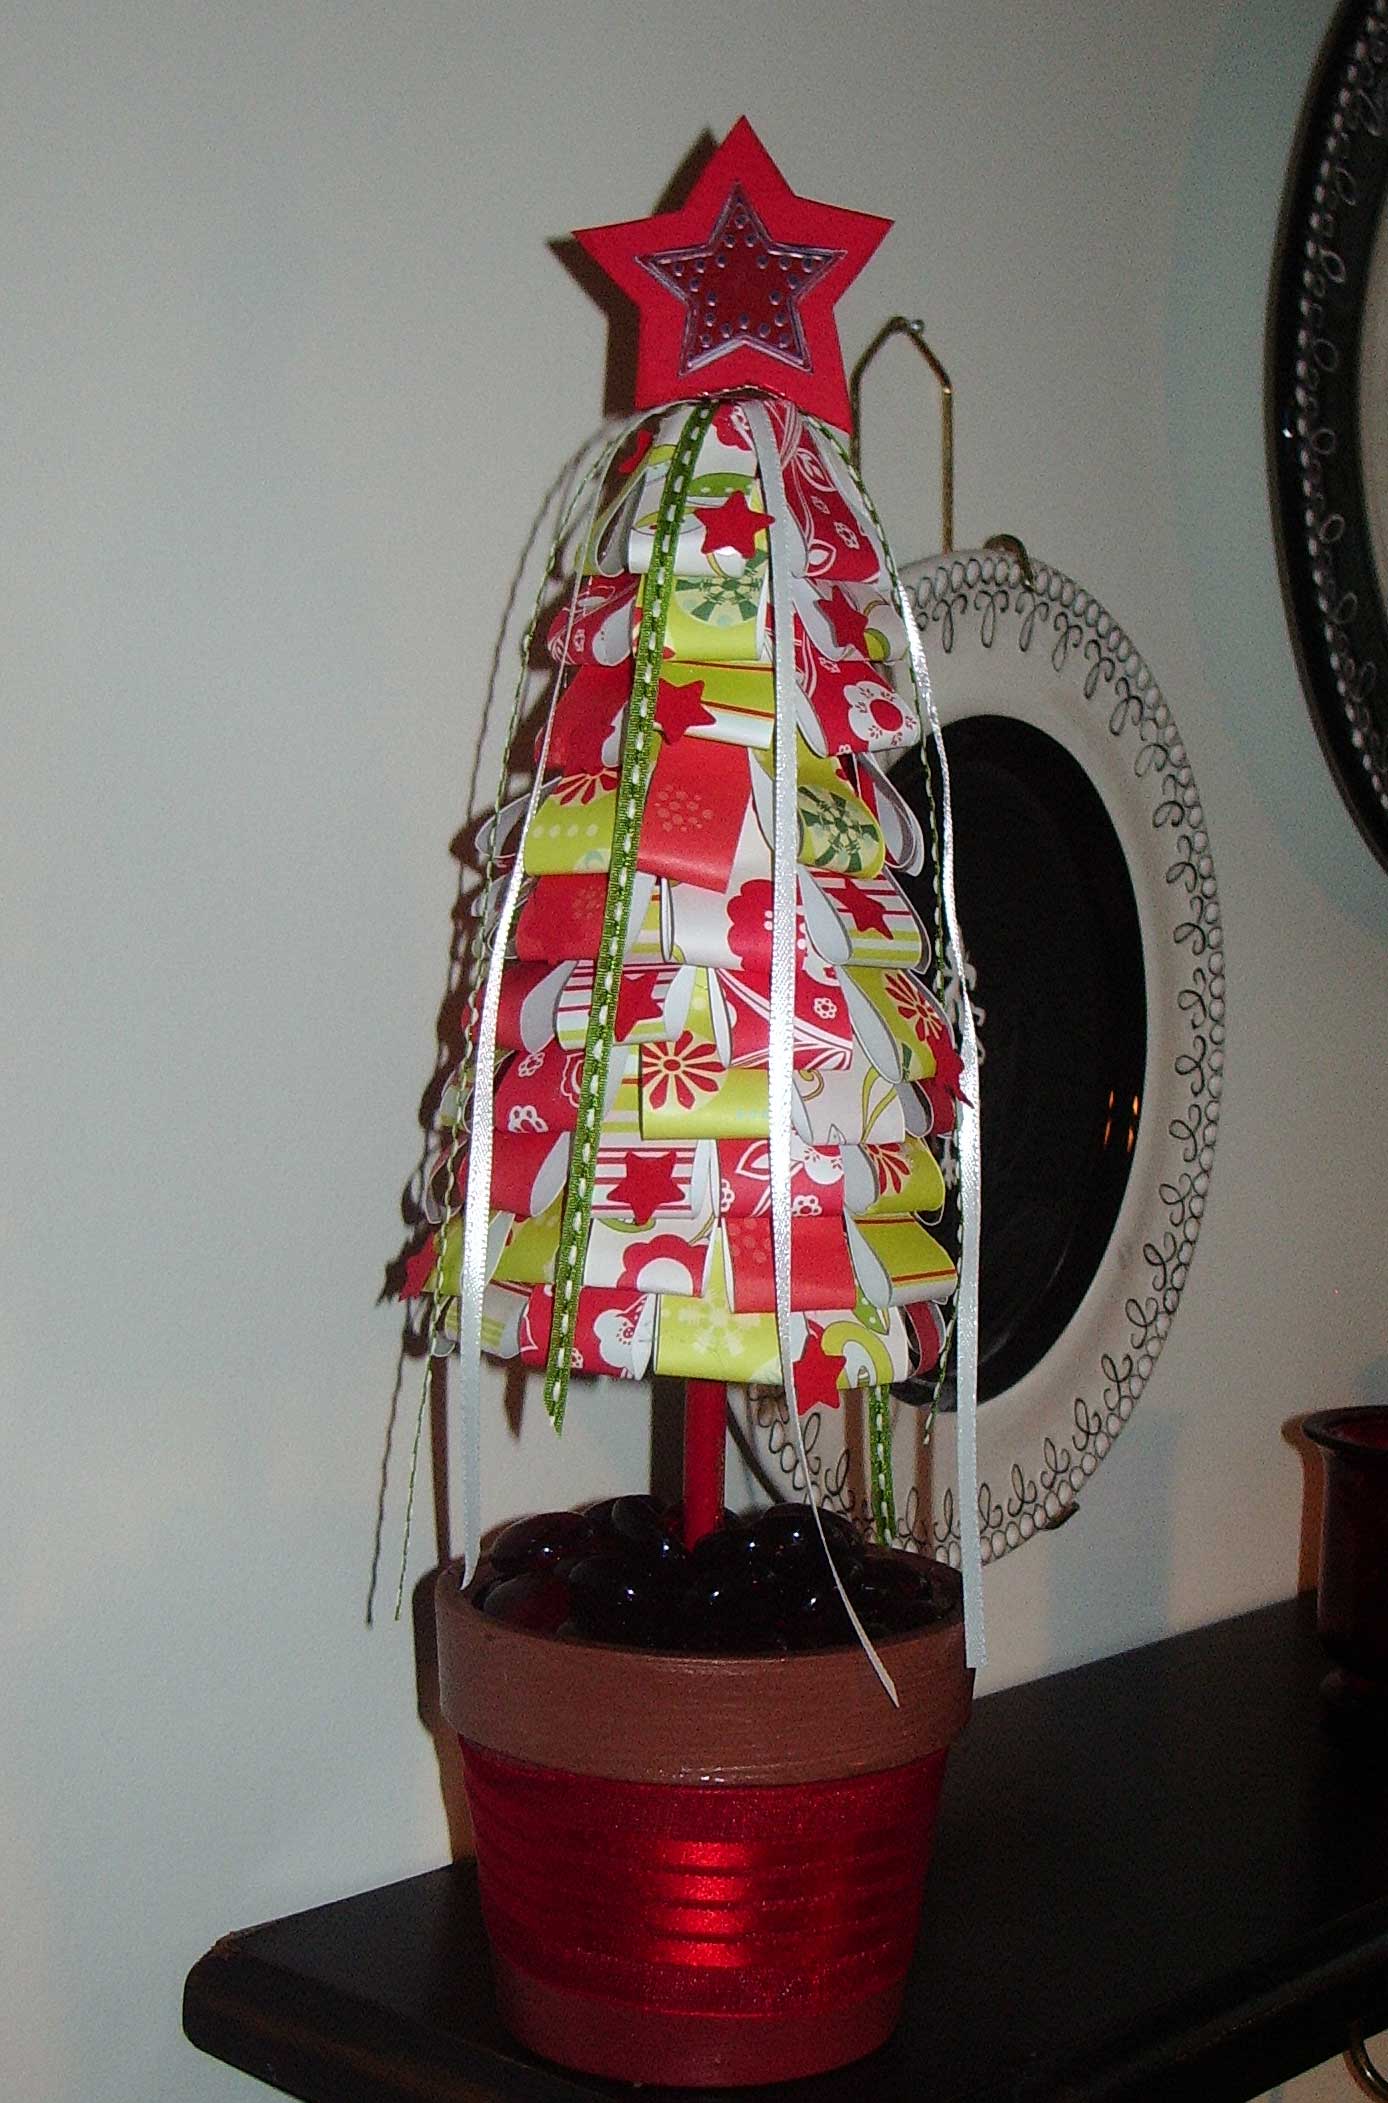
So here it goes.  I have been working on this Paper Christmas Tree.  I say “working” because it did take me a few days.   I did it in bits and pieces when the lil bugger was down for naps.  However, if you have some older kids who can help you out you’ll finish it in no time! 

Here’s what you need:

Favorite patterned paper (I chose 5 different ones)
Tree shaped craft Styrofoam (find in floral section of craft store)
Scissors, glue (I used glue gun), ruler, pencil
Stick (smooth and rounded)  Can find at craft store.  Size depends on Styrofoam
Ribbon and other embellishments (optional)
Spray Glitter (optional)
Terra cotta pot (optional)
Small piece of craft styrophoam to put in terra cotta pot (optional)

Glass marbles (optional)

Now the To Do’s:

1. I used 8×8 scrapbook paper since my Styrofoam base was relatively small (around 5 inches tall).  I measured and cut it into 2cm wide strips.  I then cut the 2cm wide strips into thirds.  You can adjust the width and length depending on what size styrophoam you choose.  The bigger you go the bigger strips you’ll want otherwise this will truly turn out to be a loooonnng  project.  The is the part that takes awhile so if you have kids who are old enough to cut and measure….for goodness sakes get them to work!
2.  Take a cut strip and attach the ends together with glue.  Don’t fold it though…you want to keep the other end rounded. 
3.Attach the glued ends to the Styrofoam with glue.  Start at the bottom.  Continue this all the way around.  When you finish one layer move up and start on the next level. Indent where you start on each new level.  A few tips:  If you have more than one child helping you on this it would go extremely quickly if you have one gluing the ends together and then the other gluing the finished piece to the Styrofoam. Next tip:  I layed out my 5 different cut papers in piles and lined them up in the order I wanted to attach them. For the most part I used that same pattern.  However, sometimes I came across areas that had too much red or too much green so I did change it up a bit when needed.  So go with what your eye tells you. If it doesn’t look right…change it up. 

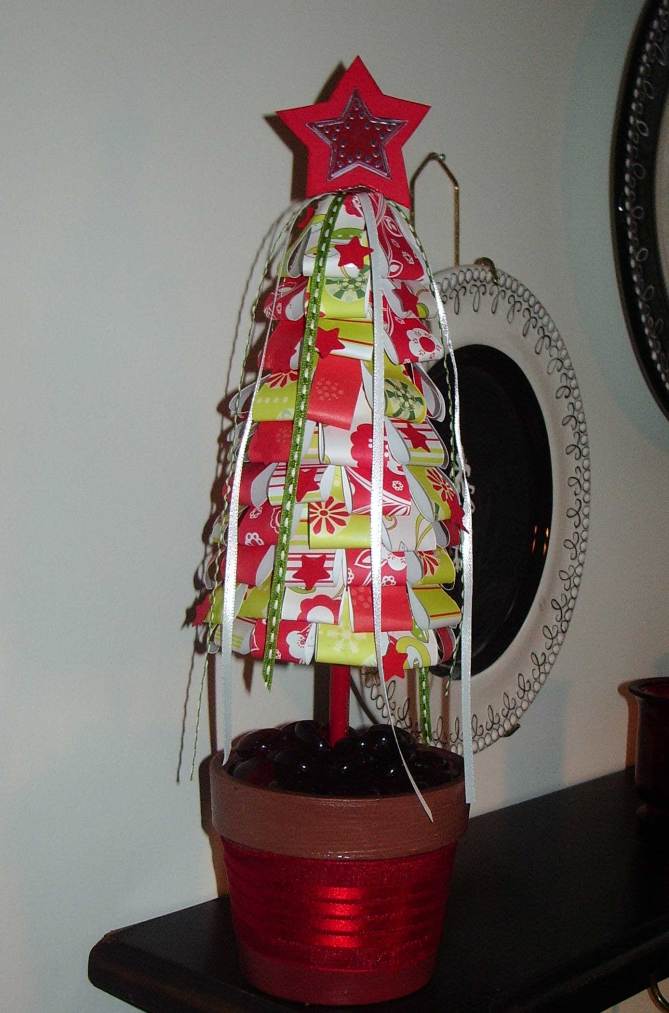
4.  Attach any embellishments.  For example, I added a star to the top along with ribbon hanging down.  I also used a star punch and red scrapbook paper to make “star ornaments” that I glued to the tree.  At the end…spray the tree with some spray glitter to give it that extra ummphh. 

5.  You could call it quits here and your paper tree would still ‘wow’ everyone as a unique Christmas decoration.  But if you want to do it like the picture I show then keep going…..

6.  Take a stick and stab it into the bottom of the tree.  I put a little glue around it with the glue gun to make sure it wasn’t going anywhere.  Confession:  The stick I had was too short.  Being lazy and not wanting to go to the craft store again I started looking around the house.  I had a red colored pencil.  So I took it and used it.  It worked out great and I didn’t have to paint it or anything!

7.  Put the small piece of Styrofoam into the terra cotta pot.  Take the other end of the colored pencil and stab it into the terra cotta Styrofoam. I once again used the glue gun to make sure it wasn’t going anywhere. 

8.  Take some glass beads/marbles and put them around the “trunk” of the tree and to cover up the Styrofoam.  You could also use fake snow if you wanted to. 

9.  I added a large red ribbon to the terra cotta pot.  If you choose to paint or decorate the pot any other way it would probably be easier to do before step 6.

Well….there you have it.  It really is a fun Christmas craft project and rewarding when you finish.  And who says you have to use red and green?  Use the colors that go with your Christmas home decor and get creative.  Instead of paper star cutouts for ornaments why not use some buttons?  You always get those extra buttons with your clothes…so put them to use!

Anyway, I enjoyed sharing this with you and will be bringing some more.   In fact, go check out the Paper Wreath I just finished!  Until then….

Be inspired, get creative, and have fun!


Gotta Make It: Footprint Resin Wall Art November 25, 2007

Filed under: Chrsitmas Gifts,Gifts,Gotta Make It,Home,Kid Gifts — inspiremecrafts @ 7:30 am

“Grandchildren are God’s reward for not killing your kids”

 footprint-resin-bw.jpg

It’s now that time to start planning the Christmas gifts you need to make!  I made these resin pictures last year for grandparents, aunts & uncles, Godparents, etc. 

The items needed:  wood from craft store, paper, glue, resin (found in your craft store usually with all the different glues), ribbon, scissors, paint

First layout some newspaper on the floor and have pre-cut pieces of scrapbook paper ready to put the footprint on.  Grab your child, paint their foot, and start stampin away on the paper.  Make extras because some won’t turn out as good as others and its always nice to have choices!  Don’t forget to have cleanup rags damp and ready to go!

Then I took a piece of wood that I found at the craft store for about $2.  I chose my favorite paper and pictures.  I chose a paint color that coordinates with the paper and painted the wood.  Let it dry.  Then use a spray adhesive to apply  your paper and pictures to the wood.

Next lay out some newspaper and find a cardboard box top.  Place the empty resin box in the middle of the cardboard box top (edges facing up).  Place the wood picture on top of the empty resin box (this raises it up from the box and prevents it from sticking to it when the resin pours off).  Then mix the resin according to the directions that come with it.  Pour the resin over the picture and spread evenly.  The directions say to blow on it to get rid of the bubbles, but  I found that a hairdryer on low works better.  That way you don’t have to inhale all the fumes…they are nasty!  The resin is going to drip off the sides and thats why the cardboard box is good to have.  Once in a while I will take scrap piece of wood or paper and scrape around the edges so it doesn’t leave drip bumps.  Let it dry as directions instruct.

When its all dry attach ribbon to the back and voila!  You have a great personal piece of art that is great for grandparents or even for your own house! The project takes a little work, but if you do them all together it goes pretty quickly.  Plus the result is well worth it! 

Be inspired, get creative, and have fun! 


Gotta Make It: Tile Coasters November 21, 2007

Filed under: Chrsitmas Gifts,Gifts,Gotta Make It,Gotta Make It...with the kids,Home — inspiremecrafts @ 7:30 am

“Never let yesterday fill up today”

photo-coasters.jpg

This is an example of a project that didn’t go the way I expected (don’t you hate that!), but  I decided to make the best of it.  I was trying to get my 18 month old to make his handprint and footprint for me on tiles.  Well, if you have an 18 month old, or have already gone through that stage, you know that they have a mind of their own and you can never predict them!  My son did not want to cooperate with handprint/footprint idea  (obvious by the picture). Instead it was more fun to make a mess and smush in his hands. So be it.  As a result, we have my son’s artwork captured on a few tiles.  Now you have a few options from here.  I’m going to make some coasters out of them.  I will trim the edges with some ribbon and add some felt to the bottom…and Voila!  Your child’s own personal artwork turned into coasters and it basically cost you about $2.  I found the tiles on sale for about 25 cents, the felt is about 25 cents, and the paint is about $1. I did add a sealent (found at craft store) to the top. The sealant was in a spray can and can be used on almost any surface.  Make sure to do it outside otherwise the fumes will have you living outside….and we don’t want that!  How on earth would you get all your projects done? 🙂

Don’t need anymore coasters?  Add some ribbon to the top and you have some artwork you can display on the wall.  Or use them as a personlized paper weight at work or in your home office.  The ideas are endless and everytime you see them they’ll definitely put a smile on your face!

Be inspired, get creative and have fun!


Gotta Make It: Thanksgiving Tablerunner November 20, 2007

Filed under: Entertaining,Gotta Make It,Gotta Make It...with the kids,Home,Thanksgiving — inspiremecrafts @ 3:21 pm

“Contentment is not the fulfillment of what you want but the realization of how much you already have”

It’s wonderful to be back home.  There’s nothing like coming home to where everything is familiar and yours.  We had a blast visiting family, but its nice to be back together again.  I had a wonderful Thanksgiving idea that would be great for making with the kids.  Unfortunately, with all the traveling I haven’t had time to make one to share a picture so I will describe it the best I can.  Its pretty simple and could be a great Thanksgiving family tradition every year.  

 A Thanksgiving table runner made by your family would add that special touch to your table this year….and every year to come.  Find an inexpensive plain table runner (I’m sure the $1 Store would have one).  Then cut out leaves from felt or your favorite fabric.  Have each child write something they are thankful for on each leaf with a fabric pen.  Then attach it to the table runner.  Depending on how crafty you are you could use the good ole glue gun or the sewing machine to attach them.  It would be fun to use the same table runner every year and have your children and yourselves add something every year.  Imagine when they are older and look back at what they wrote when they were 4.  It could provide dinner amusement and great conversation starters!

I hope you have fun trying this one and I would love to see pictures to share with everyone if you decide to do it.  If so, please send them to inspiremecrafts@yahoo.com!

Be inspired, get creative and have fun!!!!


Gotta Make It…with the Kids: Thankful Tree November 8, 2007

Filed under: Entertaining,Gotta Make It,Gotta Make It...with the kids,Home,Thanksgiving — inspiremecrafts @ 7:32 am

“Having someone to love is family, having somewhere to go is home, having both is a blessing”

imgp0993.jpgimgp0996.jpg

This Thanksgiving family project is fun and easy and will help celebrate the holiday and give thanks.  I already had the vase and branches as decor in our house so I decided to make a Thankful tree from it.  You can find the branches at your craft store for around $5 and any vase will do. 

During the month of November, make some tags to hang from your Thankful tree explaining what you are thankful for.  I used the same type of luggage tags as I did for the Thanksgiving Banner – they are just a smaller size.  On one side write “I’m thankful for….” and then on the other side your family can each write what they are thankful for on their own tag.  Mine are really simple here, but let them have fun and decorate theirs any way they want.  Run a ribbon through the hole and hang from your tree.

You can do this as often or as little as you like.  For example, you can sit down in one sitting and each do several tags or you can make it a Sunday project where every Sunday you each do one and add it to the tree.  Its your choice based on your family’s schedule.  Then on Thanksgiving dinner you move the Thankful tree to your table and it can be your centerpiece. 

Then when Thanksgiving is over add them to a scrapbook or special box.  When your kids are older they will have fun looking at what they wrote.  Since my son is too young to participate this year, I wrote his based on what he might say.  He loves his milk so I put “whole milk” for him.  He’ll get a good laugh when he’s older and it will spark my memory of this wonderful time.

Be inspired, get creative, and have fun!!!!